The Prologue from "The Alchemist"...
by Paulo Coelho
The Alchemist picked up a book that someone in the caravan had brought. Leafing through the pages, he found a story about Narcissus.
The alchemist knew the legend of Narcissus, a youth who daily knelt beside a lake to contemplate his own beauty.
He was so fascinated by himself that, one morning, he fell into the lake and drowned. At the spot where he fell, a flower was born, which was called the narcissus.
But this was not how the author of the book ended the story.
He said that when Narcissus died, the Goddesses of the Forest appeared and found the lake, which had been fresh water, transformed into a lake of salty tears.
"Why do you weep?" the Goddesses asked.
"I weep for Narcissus," the lake replied.
"Ah, it is no surprise that you weep for Narcissus," they said, "for though we always pursued him in the forest, you alone could contemplate his beauty close at hand."
"But... was Narcissus beautiful?" the lake asked.
"Who better than you to know that?" the Goddesses said in wonder, "After all, it was by your banks that he knelt each day to contemplate himself!!"
The lake was silent for some time.
Finally it said:
"I weep for Narcissus, but I never noticed that Narcissus was beautiful. I weep because, each time he knelt beside my banks, I could see, in the depths of his eyes, my own beauty reflected."
-------------------------------------------------------------
Saturday, October 18, 2008
Saturday, October 11, 2008
Remove Red Eye using Adobe PhotoShop
Most of the times, the reflected Flash light from camera creates red-eye in the photos, that spoils very nice photos.
Here's a simple tip to remove this red-eye effect.
Tools required: Adobe PhotoShop [PS] Version 7 or above.
Skill level: Basic.
So let's kick off.
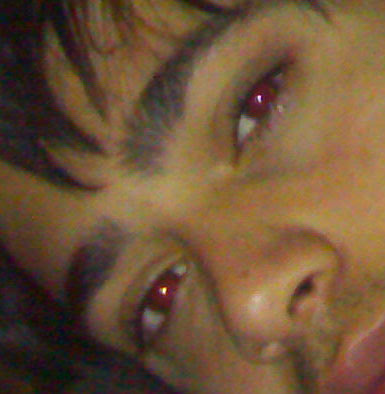
Below is the sample photo, with red-eye.
Open a photo in PS.
To avoid any mishap, Create a copy of that photo first.
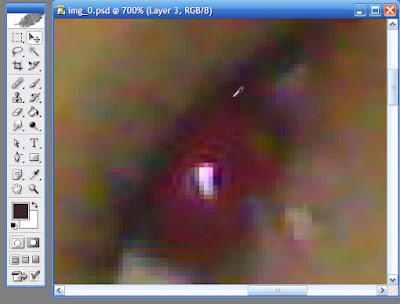
Using Zoom tool [Shortcut key: Z, or Ctrl++, Command++], zoom the canvas so that you can see the red eye in quite a larger size. You'll notice that some part of the iris is not red, so we can take the eye color from that part.
Using eyedropper tool [I], click on the non-red portion of the iris to take eye-color shade, as shown in image below. If you can't find the right color, you can choose the most suitable color yourself.
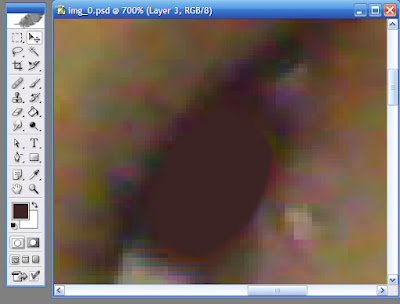
Create a new layer above the Photo layer.
Using Paintbrush tool [B], paint over the red part of the eyes.
For best results, use a brush with some feather-edges around. [Right click the brush tool on the canvas and keep the Hardness value to around 50-70%, or choose a brush with soft edge]. Your Photo will look like, as shown below:
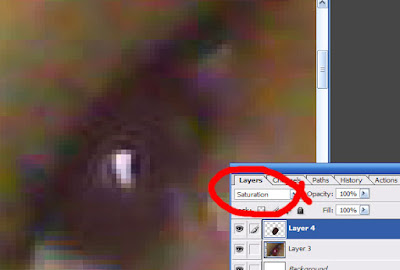
 Now, in your Layers panel, [If that is not open, go to Windows > Layers, to open it], change the blending mode of your painted layer to Saturation, as marked in the image below. This will remove the red color, while keeping the shine intact.
In many cases, you are done at this step. But if you still feel that there's some further amendments required, proceed to next step.
Duplicate the layer on which you painted the eyes. [Right click that layer and choose Duplicate, or simply Ctrl+J, Command+J]
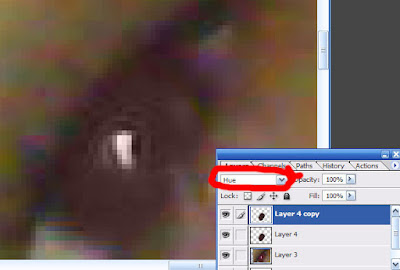
Change the blending mode of that new layer to Hue, as shown in image below:
 Zoom out the image to original size.
Congrats!
You're done!
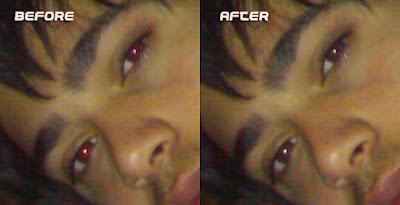
Compare the result with the original one.
No one will guess... :-)
Here's a simple tip to remove this red-eye effect.
Tools required: Adobe PhotoShop [PS] Version 7 or above.
Skill level: Basic.
So let's kick off.
Below is the sample photo, with red-eye.

Open a photo in PS.
To avoid any mishap, Create a copy of that photo first.
Using Zoom tool [Shortcut key: Z, or Ctrl++, Command++], zoom the canvas so that you can see the red eye in quite a larger size. You'll notice that some part of the iris is not red, so we can take the eye color from that part.
Using eyedropper tool [I], click on the non-red portion of the iris to take eye-color shade, as shown in image below. If you can't find the right color, you can choose the most suitable color yourself.

Create a new layer above the Photo layer.
Using Paintbrush tool [B], paint over the red part of the eyes.
For best results, use a brush with some feather-edges around. [Right click the brush tool on the canvas and keep the Hardness value to around 50-70%, or choose a brush with soft edge]. Your Photo will look like, as shown below:
 Now, in your Layers panel, [If that is not open, go to Windows > Layers, to open it], change the blending mode of your painted layer to Saturation, as marked in the image below. This will remove the red color, while keeping the shine intact.
In many cases, you are done at this step. But if you still feel that there's some further amendments required, proceed to next step.
Duplicate the layer on which you painted the eyes. [Right click that layer and choose Duplicate, or simply Ctrl+J, Command+J]
Change the blending mode of that new layer to Hue, as shown in image below:
 Zoom out the image to original size.
Congrats!
You're done!

Compare the result with the original one.
No one will guess... :-)
Subscribe to:
Posts (Atom)